EC2 에서 Airflow 이용해서 scheduling하기
가상환경에서 Airflow 구축한걸 이어서 AWS EC2에 Airflow를 구축해서 scheduling 하는 작업까지 해보겠다
1. EC2 instancd 생성

Launch instances를 눌러 아래와 같은 화면으로 진입한다

instance 이름을 정해준 후 os를 ubuntu로 선택해 주자

instance type은 t2.xlarge를 선택해 주었고 key pair는 기존에 사용하던 key pair을 사용했다
만약 key pair가 없다면 create new key pair을 눌러 새로 만들어주도록 하자

Network setting의 경우도 기존에 사용하던 security groups를 선택해서 사용하였는데
이것도 기존에 사용하던 것이 없다면 Create security group으로 만들어주자

참고로 security group의 inbound rules는 다음과 같이 설정해 주었다
테스트 목적으로 사용했기 때문에 모든 traffic에서 모든 port를 사용할 수 있도록 설정해 주었다

이후 storage 용량을 정하고 Launch instance를 누르면 EC2 instance가 생성이 된다


- EC2 인스턴스 확인


아래 사진의 위의 두줄은 airflow에서 사용할 dag와 upbit api를 통해 데이터를 받아오기 위한. py파일을 미리 EC2 instance로 보내주었다


# coin_api.py
from datetime import datetime, timedelta
from textwrap import dedent
from airflow import DAG
from airflow.operators.bash import BashOperator

dag_arg = {
    'dag_id': 'coin_get_api_test',
    'default_args': {
        "depends_on_past": False,
        "email": ["winter0pear@gmail.com"],
        "email_on_failure": True,
        "email_on_retry": True,
        "retries": 3,
        "retry_delay": timedelta(minutes=1),
    },
    'description': "upbit api call test",
    'catchup': False,
    'tags': ["coin test"],
    'start_date': datetime(2023, 9, 4),
    'schedule_interval': timedelta(minutes=3),
}

with DAG(**dag_arg) as dag:
    get_api = BashOperator(
        task_id="coin_api",
        bash_command="python3 /home/ubuntu/get.py",
    )
# get.py
import requests
import json
import pandas as pd
import mysql.connector

url = "https://api.upbit.com/v1/candles/days?market=KRW-BTC&count=200"

headers = {"accept": "application/json"}

response = requests.get(url, headers=headers)

file_path = 'response.json'

with open(file_path, 'w') as f:
    f.write(response.text)

# JSON 파일 경로 설정
json_file_path = 'response.json'

# MySQL 연결 설정
db_config = {
    'user': 'jeonh',
    'password': '1234',
    'host': 'localhost',
    'database': 'coin_info'
}

# JSON 파일 읽기
with open(json_file_path, 'r') as json_file:
    data = json.load(json_file)

# MySQL 연결 생성
connection = mysql.connector.connect(**db_config)
cursor = connection.cursor()

# 데이터 적재
for entry in data:
    query = """
    INSERT INTO btc_candle (market, candle_date_time_utc, candle_date_time_kst, opening_price,
                            high_price, low_price, trade_price, timestamp, candle_acc_trade_price,
                            candle_acc_trade_volume, prev_closing_price, change_price, change_rate)
    VALUES (%s, %s, %s, %s, %s, %s, %s, %s, %s, %s, %s, %s, %s)
    """
    values = (
        entry['market'], entry['candle_date_time_utc'], entry['candle_date_time_kst'],
        entry['opening_price'], entry['high_price'], entry['low_price'], entry['trade_price'],
        entry['timestamp'], entry['candle_acc_trade_price'], entry['candle_acc_trade_volume'],
        entry['prev_closing_price'], entry['change_price'], entry['change_rate']
    )
    cursor.execute(query, values)

# 변경 사항 저장 및 연결 종료
connection.commit()
cursor.close()
connection.close()

print("데이터 적재 완료")
2. Airflow 설치
Airflow를 설치하는 방법은 다음 글을 참고하자
가상환경에서 에어플로우 구동하기
1. Anaconda 가상환경 만들기 $ conda create -n {가상환경 이름} python={파이썬 버전} 가상환경이 잘 생성 되었는지 확인하고 가상환경을 활성화 해준다 $ conda info -envs $ source ~/anaconda3/bin/activate {가상환경
whatdoitoday.tistory.com
python과 airflow를 설치하고 나면 방금 로컬에서 instance로 넣어준 get.py에는 mysql에 접속하기 위한 패키지가 필요하다
아래 명령문으로 설치해 주도록 하자
$ pip install mysql-connector-pythonairlfow.cfg까지 설정하고 나서 주소창에 {public ip}:8080으로 airflow webserver에 접속해 보자

터미널에서 Airflow 서버를 백그라운드로 실행시키는 쉘 스크립트를 짜주자
#!/bin/bash
nohup airflow webserver --daemon &
nohup airflow scheduler --daemon &
스크립트를 실행해 주면 EC2 instance가 켜질 때 자동으로 airflow 서버가 실행되게 할 수 있다
3. MySQL workbench 연동
get.py를 작동시키면 MySQL에 자동으로 데이터가 적재되기 때문에 로컬의 workbench에서 EC2 MySQL에 접속할 수 있도록 해야 한다
먼저 root 계정으로 접속해서 MySQL 계정을 생성해 주도록 하자
$ sudo mysql -u root -pCREATE USER 'user1'@'%' IDENTIFIED BY '1234';
GRANT ALL PRIVILEGES ON *.* TO 'user1'@'%';
FLUSH PRIVILEGES;
로컬의 workbench로 이동해서 생성한 계정에 로그인 해보자

store in keychain을 눌러 비밀번호를 입력하자

이후 Test Connection을 눌러 연결이 잘 되었는지 확인해 보자
연결이 잘 되었다면 아래의 사진처럼 나타날 것이다

MySQL에 접속한 이후 coin_info라는 database를 만들고 table을 만들어 두자
create database coin_info;
use coin_info;
CREATE TABLE btc_candle (
    id INT AUTO_INCREMENT PRIMARY KEY,
    market VARCHAR(20),
    candle_date_time_utc DATETIME,
    candle_date_time_kst DATETIME,
    opening_price DECIMAL(20, 8),
    high_price DECIMAL(20, 8),
    low_price DECIMAL(20, 8),
    trade_price DECIMAL(20, 8),
    timestamp BIGINT,
    candle_acc_trade_price DECIMAL(30, 15),
    candle_acc_trade_volume DECIMAL(20, 8),
    prev_closing_price DECIMAL(20, 8),
    change_price DECIMAL(20, 8),
    change_rate DECIMAL(20, 10)
);

select * from btc_candle;
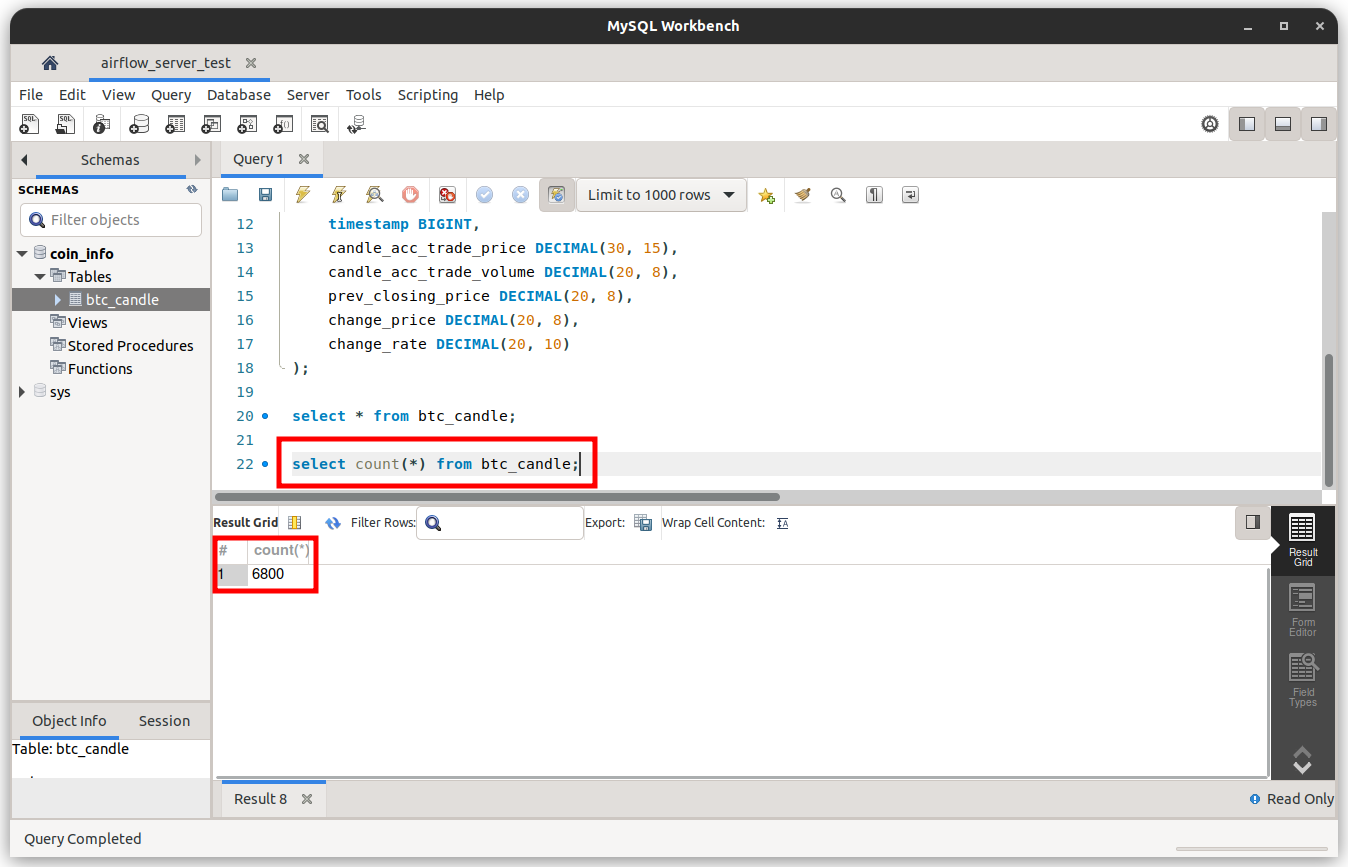
4. Airflow에서 coin_api.py를 작동해 보자
DAGs에서 박스 친 부분을 눌러주면 스크립트가 실행되게 된다


MySQL에서도 데이터가 잘 적재되는지 확인해 보자